STEP 1
If using Cat6 UTP cable, trim center spline/pair separator as close to
the cable jacket as possible without nicking any of the wire conductors.


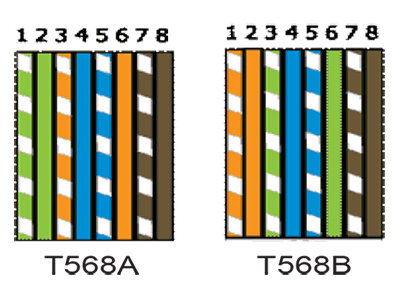
Align wires according to Termination Pattern either Type A or Type B.
Hint: Hold wire so that the White Orange and Orange wires are closest to you and put in wire
pattern order 1-8.
STEP 3
Then straighten and align wires to the correct alignment pattern (Type A or B). The B Pattern is most commonly used today. Using an angled flush cutter tool (such as Simply45 part: S45-801), trim wire ends straight before inserting them into the load bar.


STEP 4
The S45-1700P plug uses a Hi/Lo wire layout. Insert the pattern-aligned wires into the rear of the plug and push them out through the front of the plug. Then verify that the wires are still in the correct pattern alignment.

STEP 5
Insert the loaded plug into the crimping socket on the Simply45 crimp tool. Make sure plug is fully inserted.

STEP 6
Firmly and in one quick and steady motion fully compress the crimper handles until it releases. The Simply45 crimpers are ratcheted. This means that the tool handles will not release until the full and complete crimping cycle has been completed.

STEP 7
Inspect the terminated plug to be sure wires have been properly trimmed.


